Thursday, February 23, 2012

If it doesn't work as a photograph try a painting. Part one of ?????

I really like the photograph, but it's just a little fuzzy, just enough that it won't work enlarged.  So what do you do?  I am in the middle of my most ambitious project to date.  I am enlarging a 8"x8" picture to a 4'x4' mural.  I will document the progress via blog.

First step is to grid the work surface. I tried something new, I've never tried this before, but the concept is good.  I took powdered charcoal and a heavyweight cotton string and a tupperware containter.  I loaded the string with charcoal and with my husband's help snapped lines on the painted masonite.  I had premarked the masonite at 6" intervals.

Next I drew in the squares and the picture started to shape up.  With careful observation, and drawing the picture is extremely close to the original picture. I was pleased at how easy it was to draw an accurate drawing. 


Once the picture was drawn, I started painting.  I think I made a mistake, but I will continue and do my best to pull it off.  I should have started with the skin tone, but I started with the hair. My husband the other talented artist in the family has said her skin is too dark, but I have a great midtone.  Now I just need to accentuate the lights and darks.  I lay in the values, and then stand back and make adjustments. It's hard to fix one area when it is only half finished.


I'll keep you updated.

Saturday, February 18, 2012

Confessions of an Artistic Insomniac: Using photographs to make paintings.

I don't know if it is the fact that I have been house bound for 4 weeks almost, the fact that I have to lay down a lot because I push too hard and over do things after having major back surgery, but I cannot sleep. I have had a LOT of difficulty sleeping for the past 2 weeks. I stayed up until 6am last night, or maybe better yet this morning. I am just NOT tired. I don't know if it helps that I'm watching a really interesting series on Netflix, or what, but I just can't sleep. I broke down a couple of weeks ago and started drawing in my sketchbook, pictures of Maddi when she was very little. I just needed to stay busy, I mean seriously when cabin fever sets in, it's all you can do to not go a little nuts. So what do I do? I taught myself to knit, started drawing, painting, photography, cleaning house, doing laundry, dishes, etc. And part of the point of this blog was to document the realms of art and photography, and how one generally will inspire the other.


So yesterday was a bit of a turning point. I got inspired, in a fit of insomnia inspired genius. I've been staring at this watercolor paper that my husband got me for a gift, and most people that create have experienced this before, but I had NO idea what to draw or paint. I had done a little sketch from one of the pictures that I took, and stared at it for a couple of days frustrated at what I thought was going to look awful. But last night I took the sketch, made a couple of adjustments, and broke out my daughter's watercolor paints, you know the cheap ones that we used in elementary school in the pans, not the artist squeeze tubes. And I just started painting.


And as I worked, it took shape, and I was excited. I played around with the shading to make it a bit more dramatic, but I have to admit that I'm pretty impressed with the final results. 

Out of curiousity, if anyone is reading this, I have to wonder if they find the most daunting task when doing a piece of artwork, is putting something or anything on that blank paper. The blank paper is when I usually freeze. If I can get an idea on paper somehow, it turns out looking pretty good, it's just broaching the blank stage.

 I have to say that yesterday I had a creative break!  I am starting a pretty ambitious piece.  I took the portrait I love so much of my daughter and am blowing it up from essentially a 8"x8" picture that I cropped, and making it into a 4'x4' mural.  I will be documenting that process.  I'll admit I really overdid it today, but I got the board (masonite) primed, and the grid lines snapped on there in charcoal.  And I took some plexiglass and gridded the picture, so I will probably start drawing tomorrow.

I'll keep you posted. 

Thursday, February 16, 2012

Depth of Field: What do YOU focus on?


So seriously I did a science experiment when I was a kid on depth of field. I'll admit that it was my dad's idea, and I really didn't get it at the time. I lined up a bunch of bears and took photos at different f-stops.  I still have a time understanding how to use it to my benefit.

Well last week I met an amazing photographer who shows his work and gives lessons on photography. He gave me some hints and tips and I am finally getting it! The look I want is achievable using various means. When dealing with longer distances, the f-stops make a difference.

 When dealing with closer distances, I'm finding more success using the macro mode. I finally figured out how to zoom the lens in macro mode. The reason I find this more ideal is because macro mode exaggerates the limited depth of field. What this means is I can take pictures closer up and blur the items in front, and items behind the object I want to be clear.


The trick is to figure out what you want to focus on, and make that the sharpest and clearest part of your picture.  
 I'm sure there are lenses out there that will do that much easier, but since the camera I'm using doesn't have the option to switch out lenses, I have to make do with what I have. But I'm not complaining, because I have figured out a way to get what I want.


 I took some neat pictures of daffodils today, I love the flip up and swivel display on the camera, although I still had to squat, I didn't have to lay on the ground to take a decent picture, I could still see the composition.

Friday, February 10, 2012

Coloring photos

There are 2 ways to color a black and white photo.  The first and traditional method is using transparent oil paint.  Of course this has extra expense to deal with.  The second is to use photo editing software and color in the areas that you have selected. 

The first way is to take and print out a black and white photograph, apply a thick layer of photo prep spray, then use just a tiny bit of color on a Q-tip and apply the color in thin layers very carefully not to press too hard. If you press too hard, it will mess up the layer of spray that was applied, and then the paint won't stick.  Although this is the traditional method, it takes too long to prep, apply, and dry.

So onto the second method.

The second method is much simpler.  I use GIMP software, it is a freeware photo editing program that is very similar to Adobe Photoshop.  It has all of the filters and editing tools, I will be working with another photographer, and we are going to compare the software, and see if there is any discernable difference between the software.  I basically converted the photo to grayscale and saved it as a new file.  Once that was done, then I changed the new file to RGB and it stayed black and white, but whatever color I used showed up.  Then using the spray painting tool with very low opacity, I started adding thin layers of color to selected areas.  The trick is to use color minimally.  If you get too carried away, you may as well just have left the picture colored.

Colorizing comes in handy when the photo is too dark and lightening the photo causes strange pixelation.  By using the spray painting tool it's easy to retouch, colorize, and smooth out the pixels.

Tuesday, February 7, 2012

Macro: The art of the small details

Okay so I'm not great at this yet, I finally have a camera that is capable of close up photography.  I am used to composing larger still life setups, not delving in for detail.  This is a new approach that will take some time to perfect.  So far it's in the testing phase. 

I printed out several pictures yesterday, and I've found there is definitely a difference in how a picture looks either on the viewfinder or on the computer screen as opposed to the physical photograph.  James my husband picked out a few that he wants to draw, as have I.  He likes the pictures of our daughter, and I like the still life photos for future drawings/paintings. 

One thing I am fully aware of that will need to happen very shortly, is I need to get my tripod out and use it for all future macro photography.  Most of the photos that I took I had to delete due to blurring.  And if it is blurred on a small scale, it will be blurry blown up.  I'm finding that the pictures that I printed, they looked fine on my computer screen, but on close inspection of the finished photo, there is some minor blurriness. 


 I downloaded an app on my Ipad that was really neat, it's Photography 101, and has tons of informative lessons on how to get the camera to really do what you want.  I need to start studying that so I can improve.  My composition skills are not bad, but I am still unsure of my camera.  It has great features that I know so little about.  And the only way to really be a great artist and a great photographer, is to know your tools.  You have to learn how to use the tool so that you don't have to think about what you are doing, it needs to be second nature. And there are two ways to learn your tools thoroughly, one is by experimenting and pushing the creative envelope.  The other is to study, learn from others who are better than you, and pick up the skills they have to teach and put them into practice.  I look forward to blogging about what I learn.  Because what I learn and how I put the insight into words, may help someone else who is learning, just like me.

Sunday, February 5, 2012

The Humble Still Life: A Study in Pure Design

Ok, so most people look at still life pictures, paintings, or photography as just a grouping of stuff.  And they would be wrong.  Still life is a way for an artist to practice or implement pure design.  There are elements of art to consider, line, shape, texture, color, form, value, and space.  These are the basic building blocks to any artwork.  Any picture can have any one or more of these things, but that doesn't necessarily make something Art.  A preschooler's scribble isn't Art, but it may have line, shapes, and color. 
Simple, clean, and although a bit bare
it still has contrast and proportion, and strong
linear elements that direct your eye in the picture.

What defines artwork from the mundane is the use of principles of design.  These are balance, proportion, emphasis, unity, harmony, contrast, movement, variety, rhythm.  With these tools the more you use in a considered and deliberate way, generally the more interesting and enjoyable the work.  Art can seem fairly simple, but when you look at a piece of work that captures your attention, see how many principles of design are in play. 

This is a little better, there is definite contrast
 and rhythm in the blue flowers.
Design can be applied to most things, including all things even remotely Art related.  To give you an example I taught myself to knit, and learned an unusual textural detail, and I was able to create a pattern of contrasting details which was done rhythmically.  And that was just knitting. 

Dynamic shadows create
their own shapes.
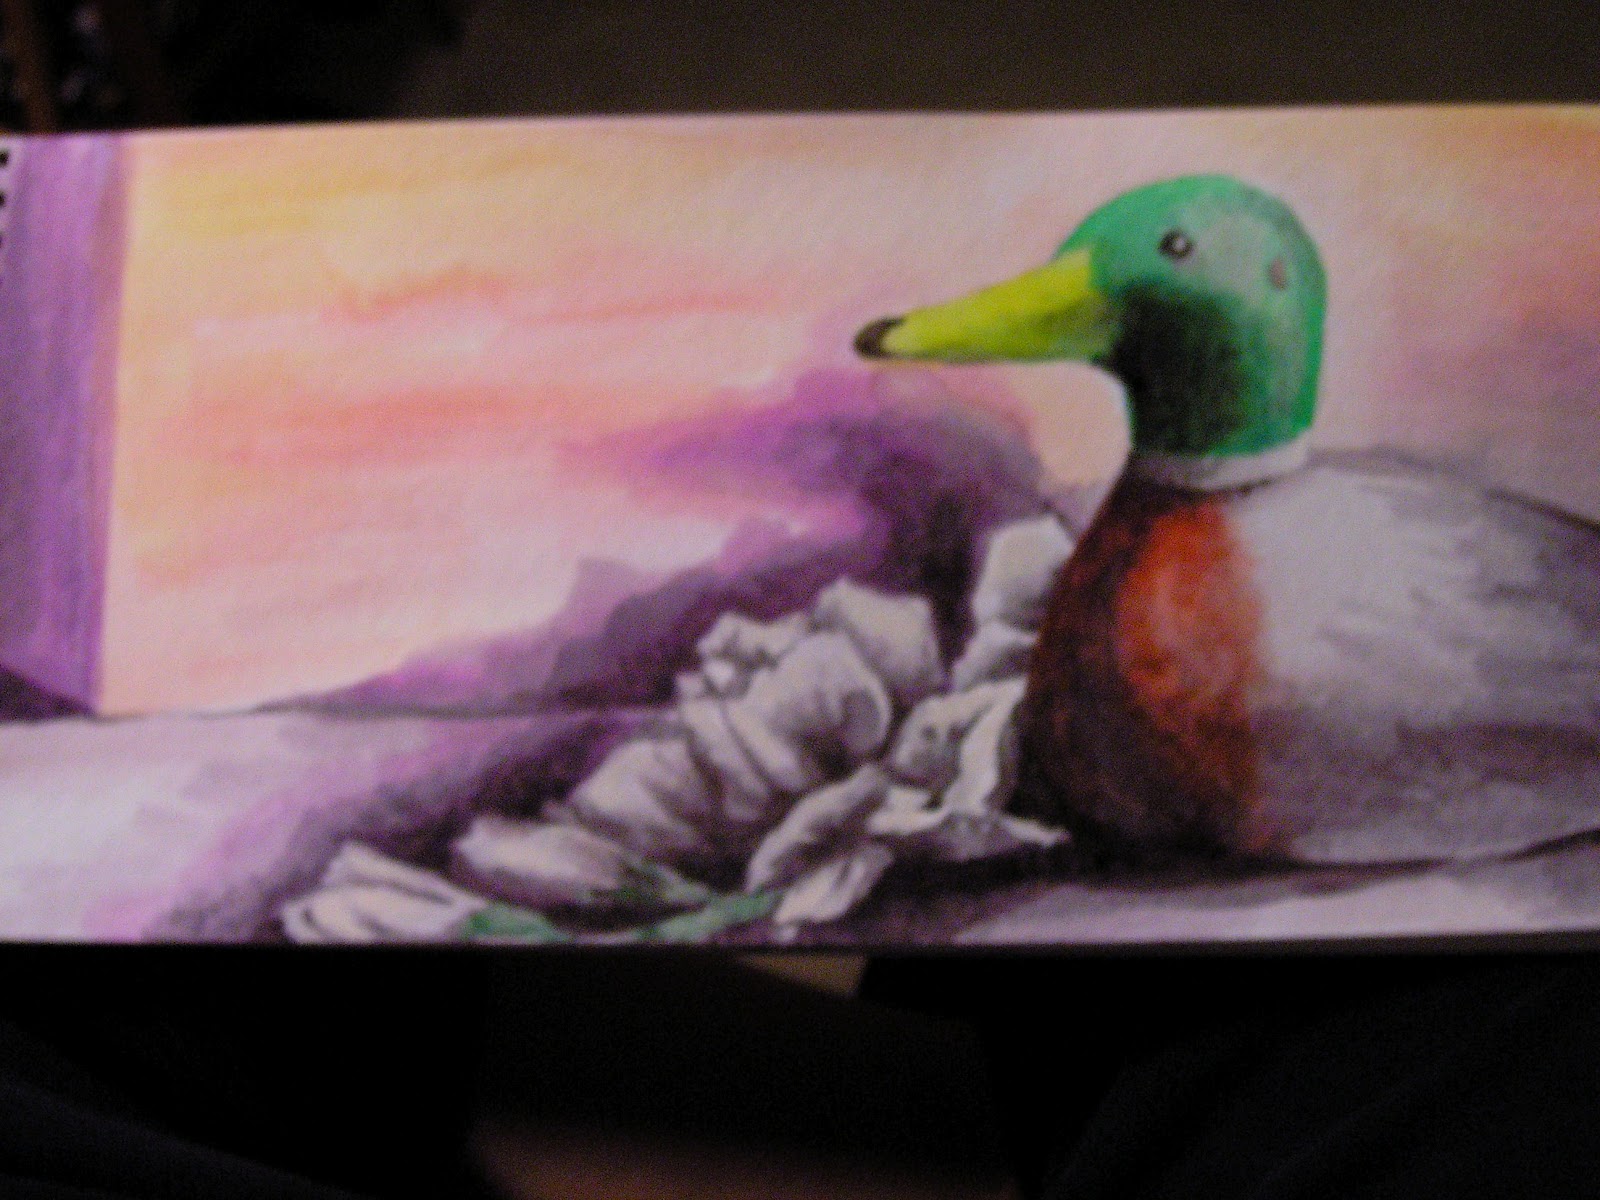
Photography is an effective means of testing designs, and creating Art.  And among the various genres like portraiture, landscapes, abstracts, and still life,  still life is under appreciated for it's value as Art.  Often times I get the impression from people that it is considered decorative.  Art should have some meaning to the artist, and it should be well designed.  Take for example the decoy.  To me it has history, it has been used by one of my clients' father, it has a past.  And contrast that with flowers which are considered decorative, or possibly transient, there is a subtle irony.  Throw in a string of pearls which are supposed to be the pinnacle of style and grace, you elevate the humble decoy to a new level of irony.  There is a contrast that is symbolic, and shows a sense of humor.  Does everyone get it? No way!  But it is something that has meaning to me as the artist, and that's what matters.  And that level of symbolism and meaning takes the still life from decorative to the realms of Art.

 A Study in Contrasts- Silk and pearls with a decoy and flowers


Will everyone agree with me?  Nope, but part of the nature of Art is to evoke a response, be that emotional, or controversy, and as long as that is achieved, then it has done its job.

Learning Digital Photography: viewpoints of a beginner.

Okay so in all honesty I'm not a photographer, at least I never considered myself one.  I have always considered myself an artist.  I went through 6 years of art school, and earned a BFA in Art Education with a concentration in drawing.  That of  course was after I failed to live up to what I fell in love with, metals.  Or to be more specific, I fell in love with the process of enamelling.  Unfortunately I did not have the skills to build the jewelry around the jewels I was creating.  I swear when I get to the point that I can do enamels again, I will outsource the finishing of the jewelry to someone with the skills to do what I want. 

In the meantime, I have taken up a new obsession since I have been forced to not work for a few weeks after having back surgery.  I have taken up photography.  There is a dual purpose to this choice.  First off, I draw, I love to draw, I am happiest with a pencil or pen, or even paint in hand, creating beautiful work.  And photography allows me to compose a picture that can be recreated later using other media.  I find that using original photography for new source material is smart.  Not only do I NOT have to worry about copyright issues, but I can also compose the pictures first through the lens, and transfer it to paper. Secondly this also allows me to have the instant gratification of composing beautiful work.  Most people don't realize that good photos have good subjects, great photos are composed and well thought out. And it may take 50-100 pictures to capture the one view that stands out from the rest. 

This is most true when photographing children.  I literally took 30 pictures of my daughter back to back, and just by accident she turned to me and gave me a heartstoppingly beautiful look, and I happened to catch it.

I am a firm believer in quantity breeds quality.  I will take tons of pictures, playing with the various settings, lighting arrangements, angles, and subjects.  I then load them on my computer and start weeding through them when I have time.  Over 3 days I took almost 400 pictures, and weeded out those that were blurry, badly exposed, and just badly composed.  I have 280 left.  Then I went through and selected those that captured my attention, and flipped back and forth finding the best composed pictures.  I have about 40 pictures that I feel are worth printing.  Of those there are about 5 that I will have blown up to 24x36 and framed.  The others will be used as source materials for drawings or paintings. 


I've seen others obsess about deleting pictures as soon as they've taken pictures.  This is narrow minded in my opinion.  What they should be doing is taking multiple pictures, and trying to catch the moment.  If you obsess about how they turn out after each one is taken you are not going to catch the happy accident that leads to mindblowing pictures, because you are too busy fiddling with the camera.